Thêm sản phẩm mới từ bảng quản trị
Điều hướng đến Thuộc tính > Thêm thuộc tính mới trong thanh bên trái của bạn. Phần Thuộc tính trong bảng quản trị của bạn được cung cấp với các khu vực sau được hiển thị trong hình ảnh bên dưới.
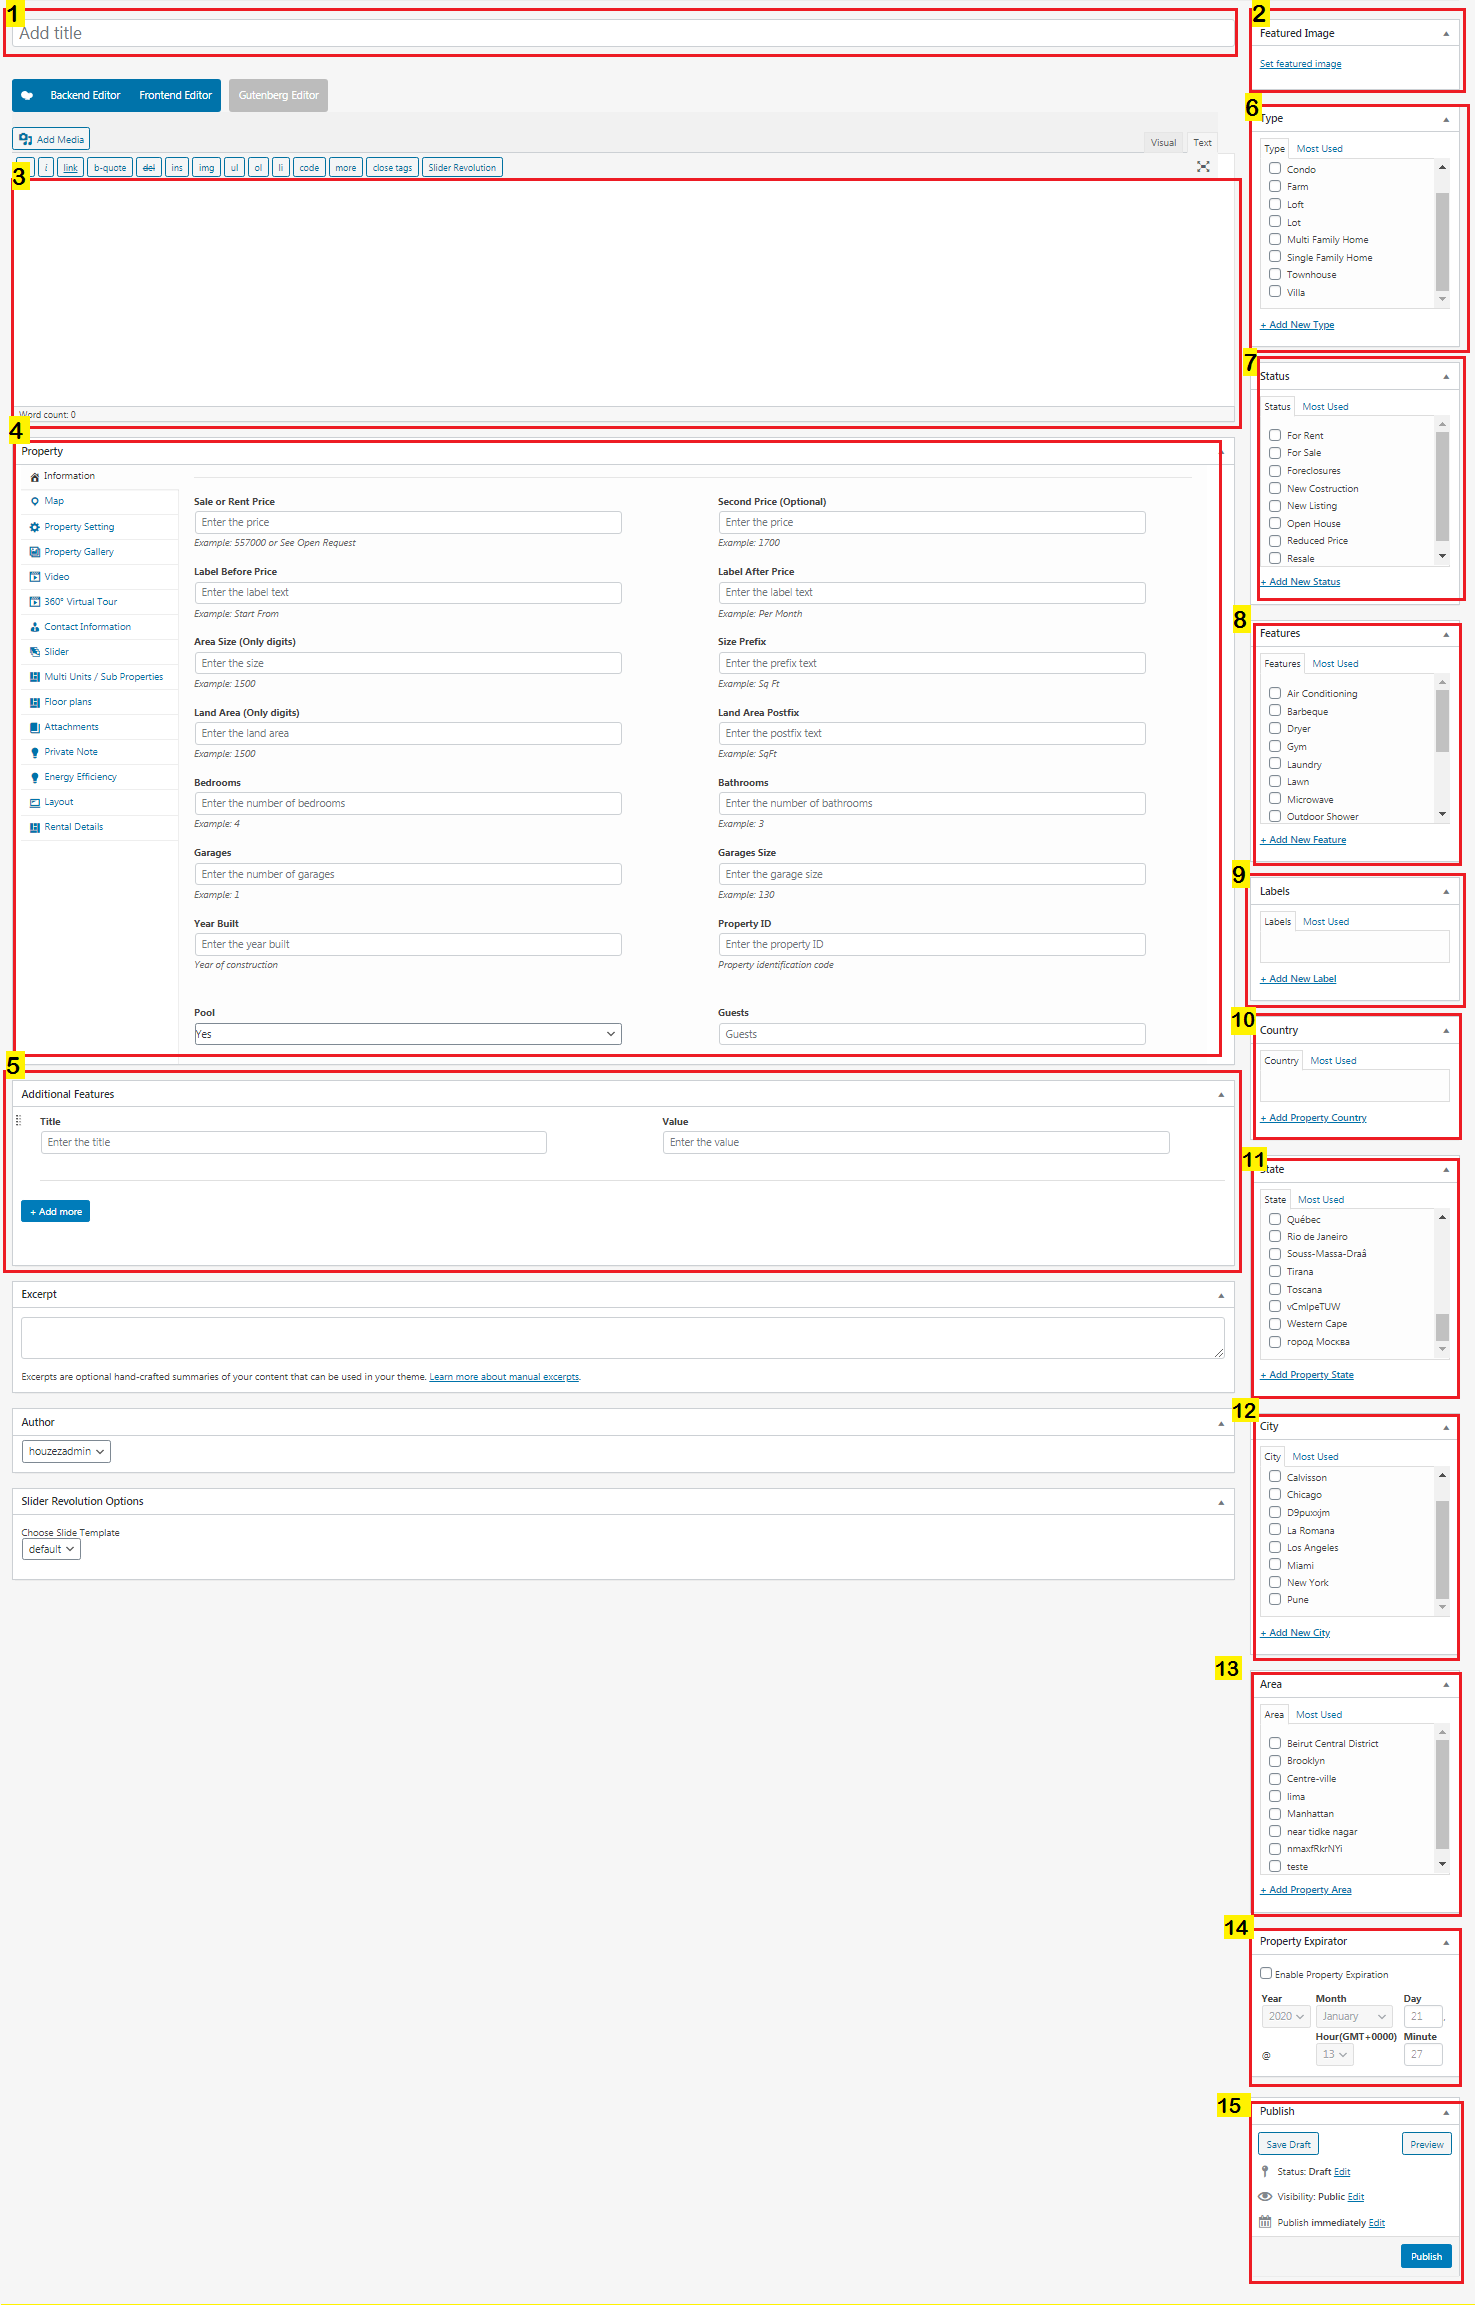
1. Tiêu đề

Nhập Tiêu đề tại đây: Thêm tên tiêu đề cho bđs của bạn
2.Ảnh đại diện
Tìm hộp Hình ảnh nổi bật trong thanh bên phải của bạn. Hình ảnh nổi bật là một tính năng chủ đề WordPress cho phép bạn tải Ảnh bìa của sản phẩm của mình lên. Hình ảnh này sẽ được hiển thị trong các trang danh sách, trang kết quả tìm kiếm, mô-đun tùy chỉnh Houzez, v.v.
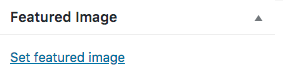
Recommend image size 1170 x 877
Để thêm hình ảnh nổi bật, chỉ cần nhấp vào liên kết Đặt hình ảnh nổi bật bên trong hộp hình ảnh nổi bật được hiển thị trong ảnh chụp màn hình ở trên. Thao tác này sẽ mở Trình tải lên phương tiện WordPress. Bạn có thể sử dụng điều đó để tải hình ảnh lên từ máy tính của mình hoặc sử dụng hình ảnh hiện có từ thư viện phương tiện của bạn.
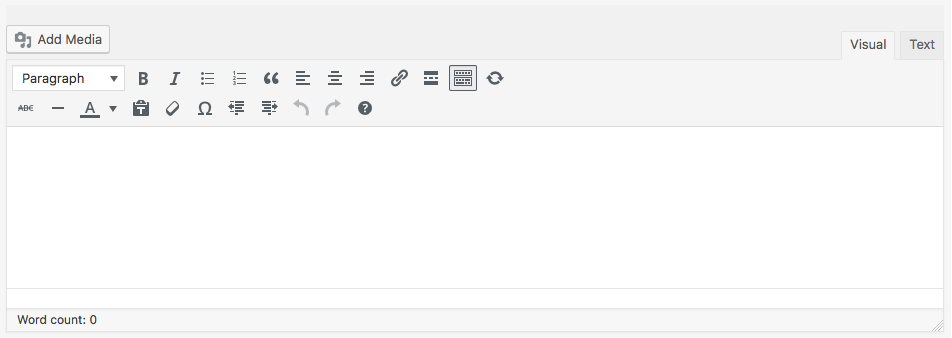
3. Nội dung chính
Thêm nội dung chính của sản phẩm BĐs tại đây
4. Bản thông tin
Tại đây cung cấp thông tin chi tiết về Bất động sản của bạn
Thông tin
Thêm thông tin như diện tích, giá, tiện ích,…
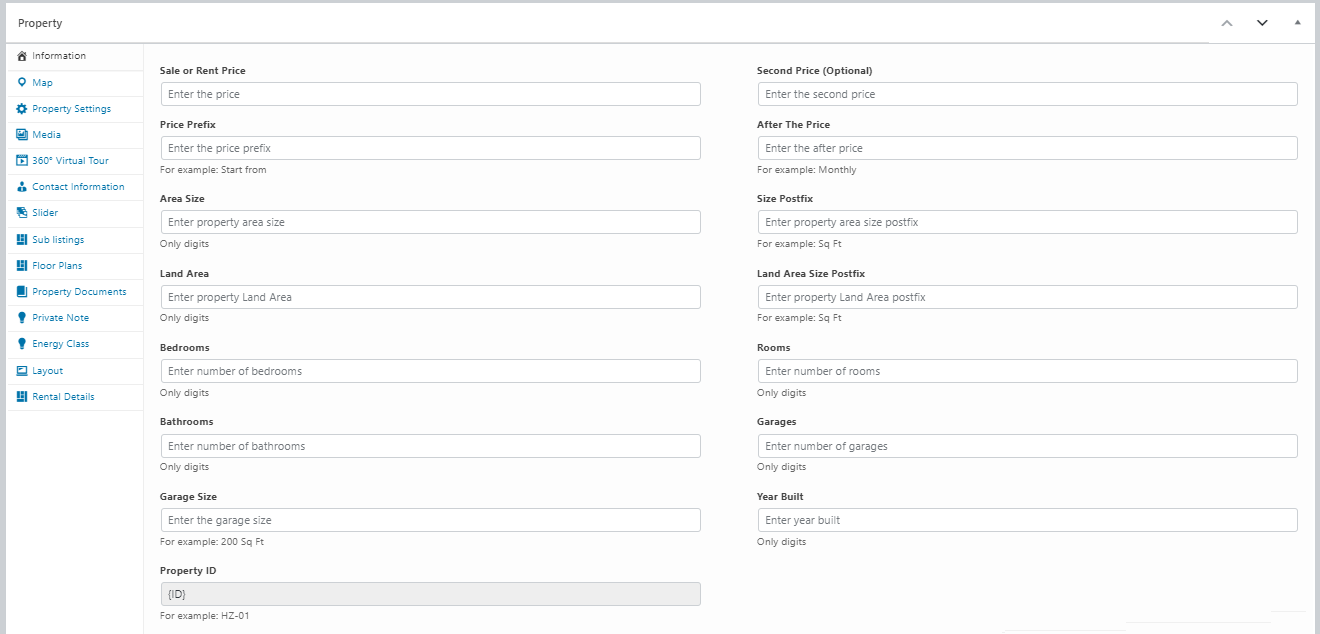
- Sale or Rent Price: Enter the price for sale or for rent of your property. For example 557000 or See Upon Request or 5999.99 etc
- Second Price (Display optional price for rental or square feet): This is an optional price where you can show the price per square feet or you can use as you want
- Before Price Label: It could be basically what you want. For example, Start From
- After Price Label: It could be basically what you want. For example Per Month
- Area Size (Only digits): Insert the property area size. For example 1500
- Size Prefix: Insert the property area size prefix. For example Sq Ft
- Land Area (Only digits): Insert the land area size. For example 1500
- Land Area Postfix: Insert the land area postfix. For example SqFt
- Bedrooms: add the number of bedrooms
- Rooms: add the number of rooms
- Bathrooms: add the number of bathrooms
- Garages: add the number of garages
- Garages Size: add garage size. For example 1500
- Year Built: Insert the year when the property was built
- Property ID: add property ID
The Property ID can be also auto-generated. To enable this option, navigate to Theme Options > Add New Property >and find the box here below. This option is disabled by default.

Locate the Map tab in the Property Panel to add the property address.
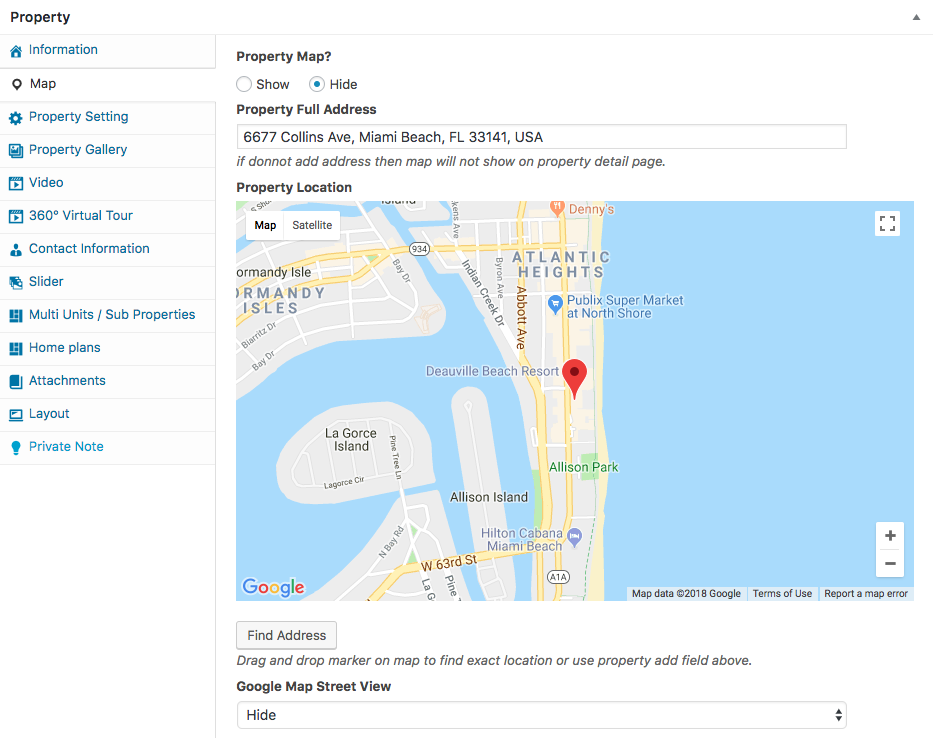
- Property Map: Select if you want to show or hide the map on the property page
- Property Address: Insert the property address. As soon as you start typing the address the system will suggest the full formatted address. Houzez keeps this information from the Google Map database.
- Property Location: Drag the google map marker to point your property location or click to Find Address button to locate the address on the map.
- Google Map Street View: Select if you want to show or hide the Google Map Street View on the property page
If you don’t see the map in this section or the Find Address button doesn’t work correctly, it’s because the Google Maps API is not set up and the API services are not enabled. Please refer to this documentation.
Property Settings
Locate the Property Settings tab in the Property Panel.
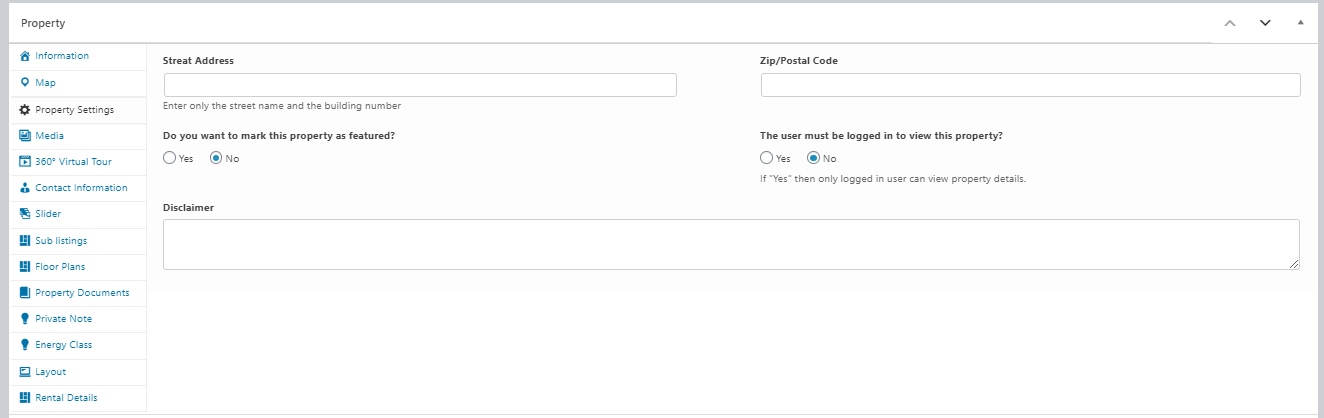
- Address (only street name and building no): Important: Insert only street name and building number. For example
- Zip: Insert the Zip/Area code
- Mark this property as featured? Select if you want to display this property as featured
- The user must be logged in to view this property This functionality has been added in version v.1.6. If you select Yes, only logged in user can view property details.
- Disclaimer: Add the Disclaimer text for your property
Property Gallery
Locate the Property Gallery tab in the Property Panel to upload the property gallery images.
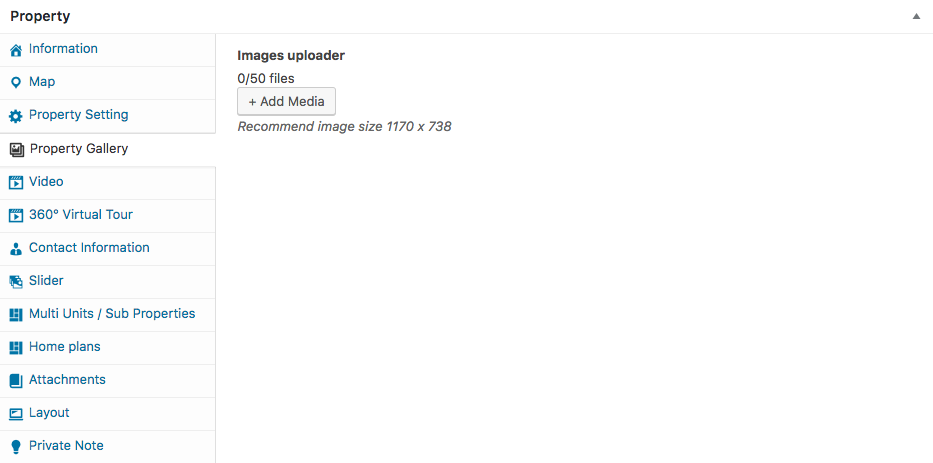
- Images Uploader: Click on + Add Media button inside the Property Gallery box displayed in the screenshot above. This will open the WordPress Media Uploader. You can use that to upload an image from your computer or use an existing image from your media library.
- After to have uploaded your images then you can re-order with a simple drag and drop.
Video
Locate the Video tab in the Property Panel to upload a property video.
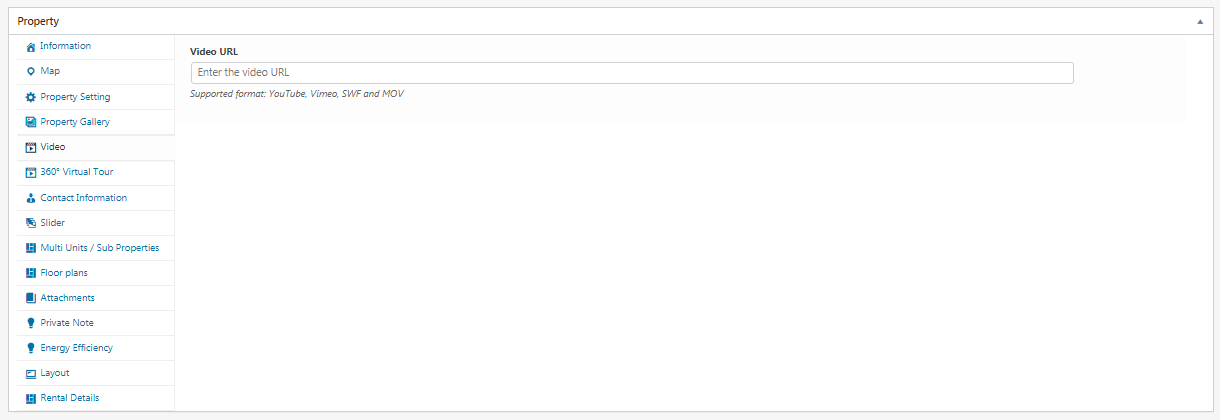
Video URL: Insert the video URL. YouTube, Vimeo, SWF File, and MOV File are supported.
360° Virtual Tour
Locate the 360° Virtual Tour tab in the Property Panel. The virtual tour functionality works fine with embed code provided by services as matterport.com

- Virtual Tour: Get the embed code of your virtual tour service
- Copy and paste the embed code provided by your service in the Virtual Tour box
Contact Information
Locate the Contact Information tab in the Property Panel.
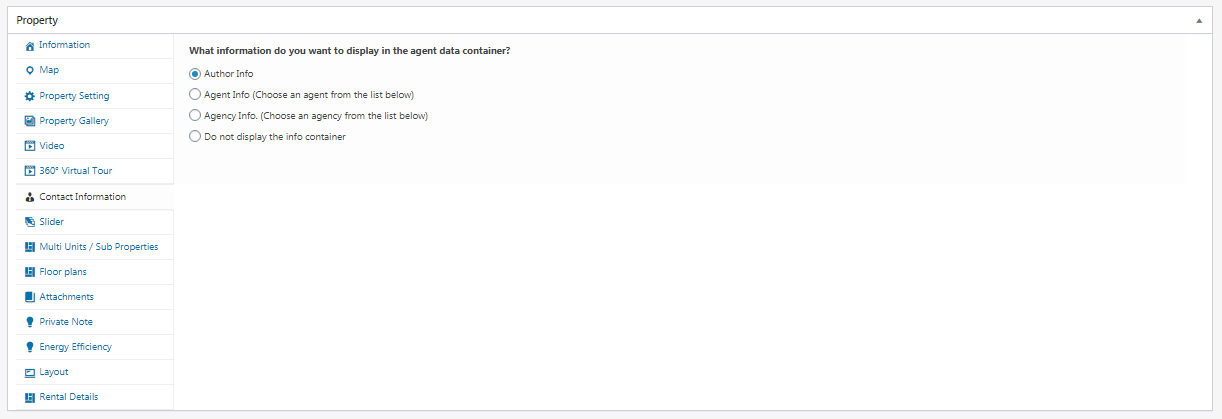
What information do you want to display in agent data containers? Select the information you want to display
- Author data
- Agent data (Choose agent from the list below)
- Do not display data container
Slider
Locate the Property Slider tab in the Property Panel. Use the Slider tab to display the property in the custom Houzez Property Slider
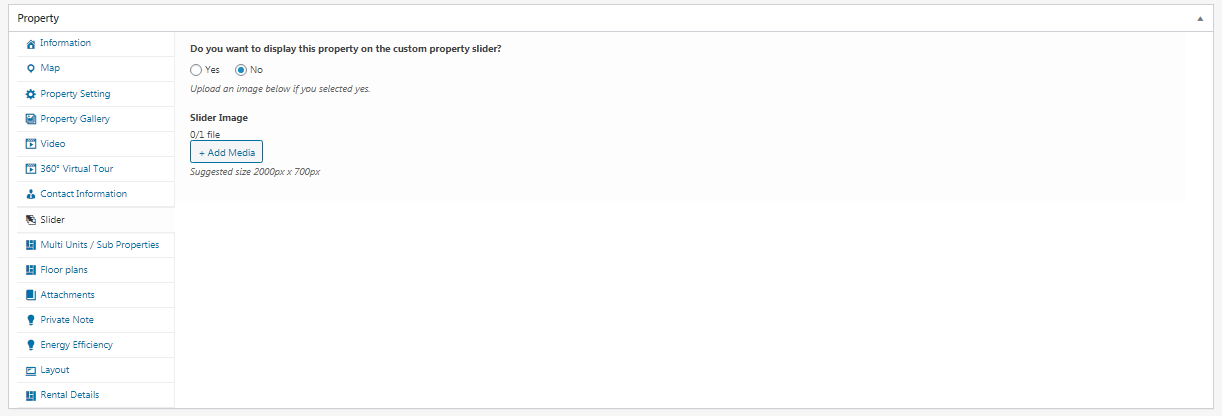
- Do you want to add this property to the property slider? If you select Yes, this property will be displayed in the custom Houzez Property Slider
- Slider Image: Select the image that will be used as a slider image. The recommended image size is 2000 x 700 px. You can use bigger and smaller images but keep the same height to width ratio. Use the same size for all images of the properties you want to add to the slider.
Multi Units / Sub Properties
Locate the Multi Units / Sub Properties tab in the Property Panel. This feature allows you to list multi-units or sub-properties within the property detail page.
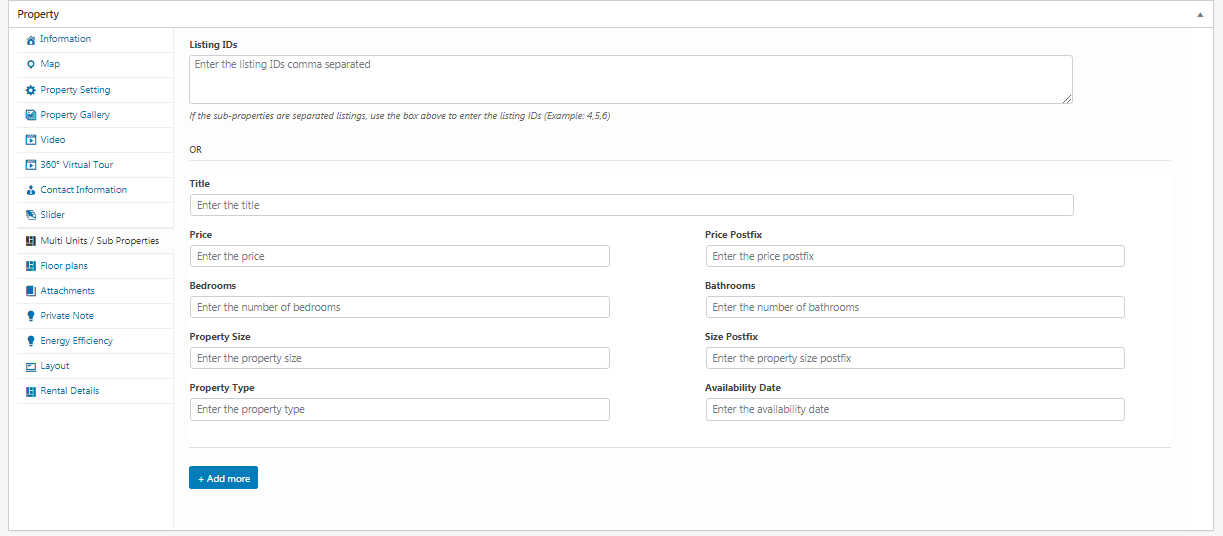
- Listing IDs: If the sub-properties are separated listings, use the box above to enter the listing IDs (Example: 4,5,6)
- Title: Add the unit title
- Price: unit price
- Price Postfix: insert the price postfix
- Bedrooms: Number of bedrooms
- Bathrooms: Number of bathrooms
- Property Size: Insert the size
- Size Postfix: insert the postfix for sizes like Sqft or Mt/q at your choice
- Property Type: Insert the property type, it can be whatever like Apartment or Living room
- Availability Date: insert the date of availability
- Click on + Add more button do add more subunit
Floor Plans
Locate the Floor Plans tab in the Property Panel. Enabling this feature you can add unlimited floor plans information to your property.
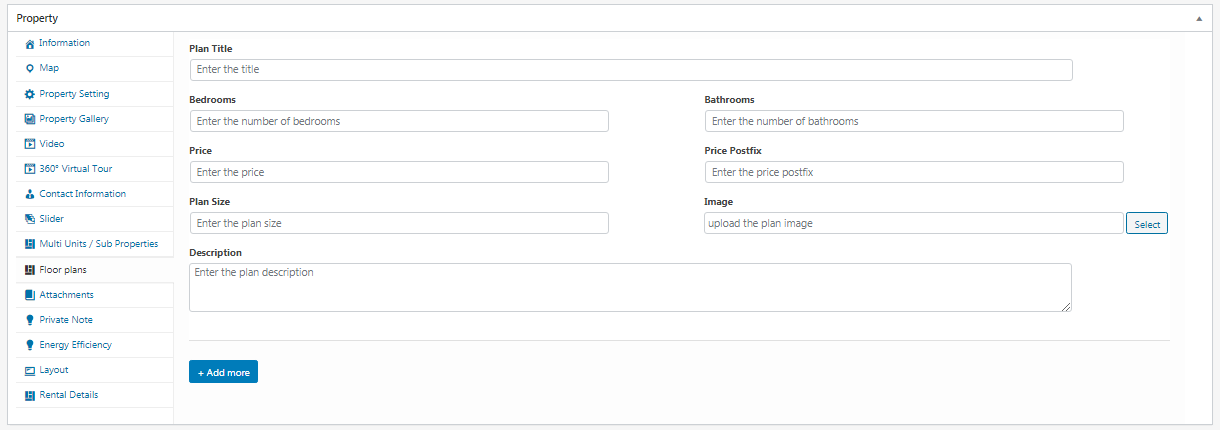
- Plan Title: Insert plan title
- Plan Bedrooms: Insert the number of plan bedrooms
- Plan Bathrooms: Insert the number of plan bathrooms
- Plan Price: Insert plan price
- Price Postfix: Insert price postfix
- Plan Size: Insert plan size
- Plan Image: Upload plan image
- Plan Description: Insert plan description
- Click on Add more button if you need to add more property plans
Attachments
Locate the Attachments tab in the Property Panel.

Attachments: You can attach PDF files, Map images OR other documents to provide further details related to property. Click on + Add Media button inside Attachments box displayed in the screenshot above. This will open the WordPress Media Uploader. You can use that to upload a file from your computer or use an existing file from your media library.
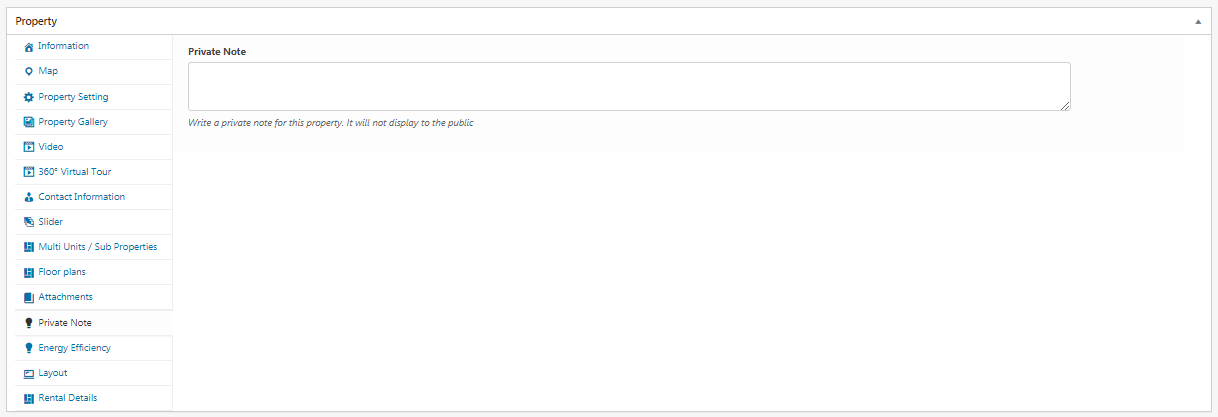
Private Note
Locate the Private Note tab in the Property Panel. Use the Private Notes tab to write a private note for the property. These notes will never be displayed for the public.
Energy Efficiency
Locate the Private Notes tab in the Property Panel. This feature is for those who do business in Europe.
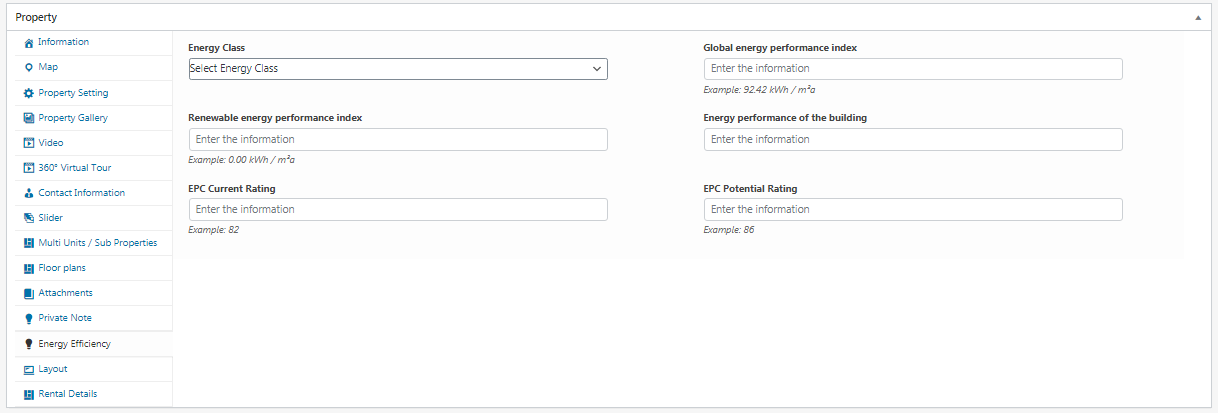
- Energy Class: Select the energy class of the building
- Global energy performance index: For i.e. 92.42 kWh / m²a
- Renewable energy performance index: For i.e. 1.00 kWh / m²a
- Energy performance of the building: Enter the building energy performance
- EPC Current Rating: Enter the information about Energy Performance Certificate current rating
- EPC Potential Rating: Enter the information about Energy Performance Certificate potential rating
Layout
Locate the Layout tab in the Property Panel. Use the Layout tab to overwrite the global Detail Property Options and display this property with a custom layout.
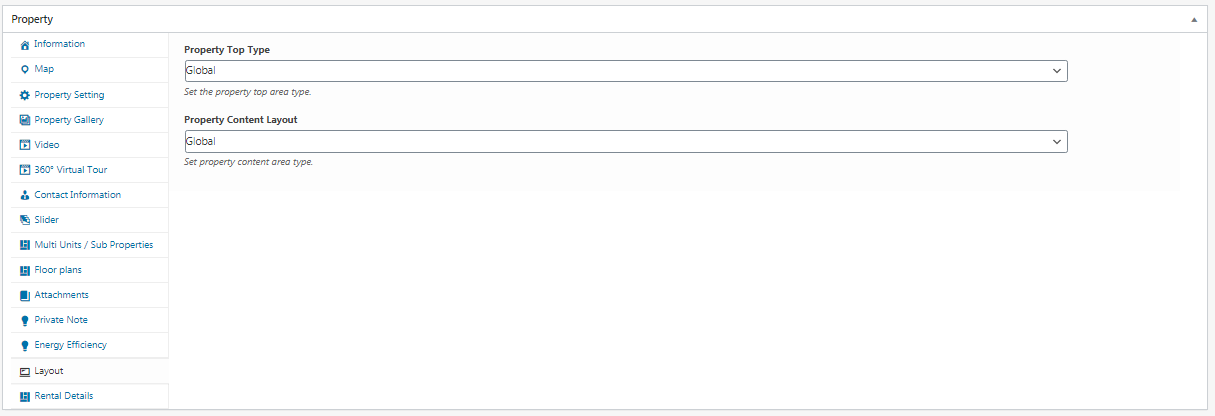
- Property Top Type: Set property top area type.
- Property Content Layout: Set property content area type.
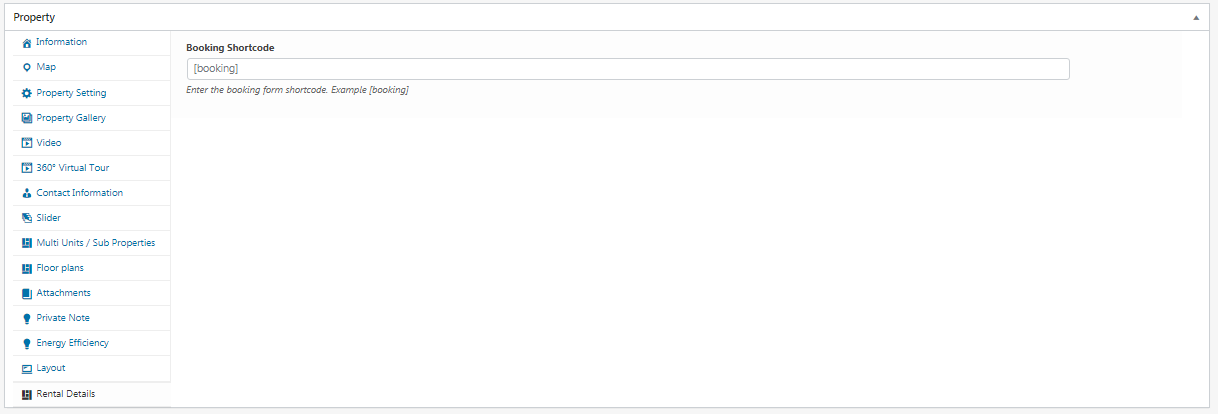
Rental Details
Locate the Rental Details tab in the Property Panel. Use the rental details tab to enter the booking form shortcode. Example [booking]
5. Additional Details
Locate the Additional Details that allows you to add unlimited additional features/details to your property.
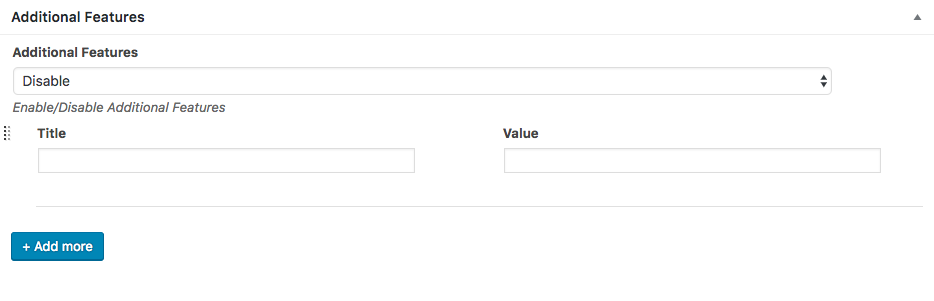
- Title: Insert additional feature title
- Value: Insert additional feature value
- Click on + Add more button if you need to add more additional features
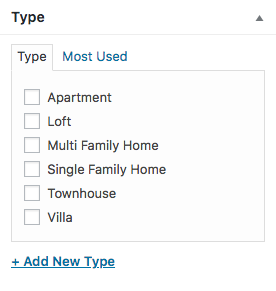
6. Property Type
Locate the Property Type box on the right sidebar. Select the property type that represents the property. View how to manage the Property Type.
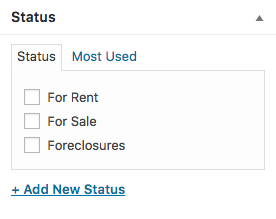
7. Property Status
Locate the Property Status box on the right sidebar. Select the property status. View how to manage the Property Status.
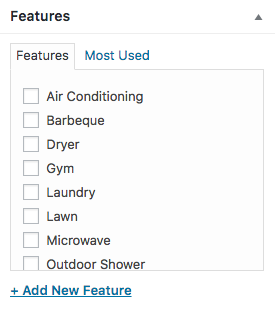
8. Property Features
Locate the Property Features box on the right sidebar. Select the property features. View how to manage the Property Features.
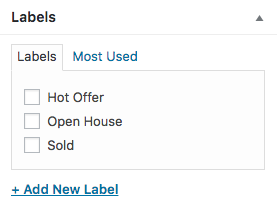
9. Property Labels
Locate the Property Labels box on the right sidebar. Select the property labels. View how to manage the Property Labels.
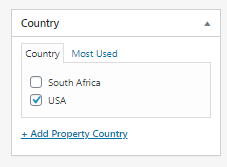
10. Property Country
Locate the Property Country box on the right sidebar. Select the property Country.
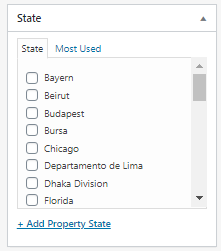
11. Property County/States
Locate the Property County/States box on the right sidebar. Select the property County/States. View how to manage the County/States.
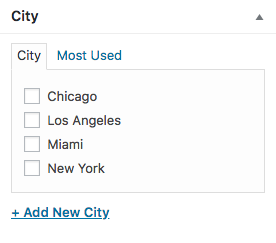
12. Property City
Locate the Property City box on the right sidebar. Select the property City. View how to manage Property City.
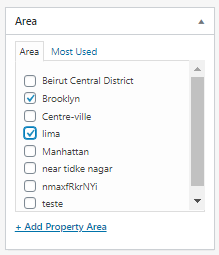
13. Property Area
Locate the Property Area box on the right sidebar. Select the property Neighborhood. View how to manage the Area.
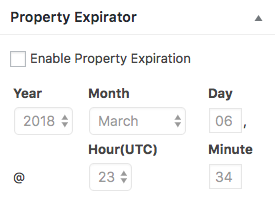
14. Property Expiration
Locate the Property Expiration box on the right sidebar. Use this box to make the property to expire at a predefined date and time.
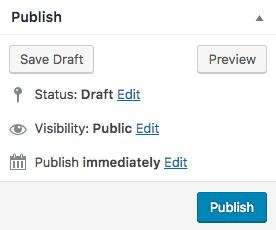
15. Publish
Locate the Publish box on the right sidebar. Use the box below to publish the property, save as draft or preview changes.